Article Content
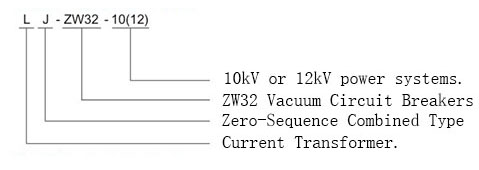
11kV Cast-Resin Current Transformer UNKNOWN for Metering and Protection – IEC 61869-2 Standard
Introduction to the UNKNOWN Current Transformer
The UNKNOWN current transformer (CT) is a cast-resin insulated instrument transformer designed for accurate current measurement and protective relaying in medium-voltage power systems operating at 11kV (IEC standard), equivalent to 10kV in domestic Chinese networks. This device leverages advanced vacuum pressure impregnation (VPI) epoxy resin technology to encapsulate high-permeability grain-oriented electrical steel (GOES) cores and precision-wound secondary windings, ensuring long-term dielectric integrity and mechanical robustness in both indoor and outdoor substation environments.
Operating Principle of Cast-Resin Insulation
Cast-resin insulation in the UNKNOWN CT employs a two-component cycloaliphatic epoxy system cured under vacuum and pressure to eliminate voids and moisture ingress. This process yields a homogeneous, non-hygroscopic solid dielectric with a relative permittivity (εr) of approximately 3.8–4.2 and volume resistivity exceeding 1×10¹⁴ Ω·cm at 20°C. Unlike oil-filled alternatives, the solid resin matrix provides inherent fire resistance (compliant with IEC 60695 flammability tests), eliminates leakage risks, and maintains stable partial discharge levels below 10 pC at 1.2 × Um/√3 (where Um = 12 kV). The thermal class is F (155°C), enabling continuous operation under ambient temperatures from –40°C to +40°C without degradation of insulation properties over its 25–30 year service life.
Advantages Over Oil-Immersed Designs
Compared to traditional oil-immersed CTs, the UNKNOWN cast-resin design offers superior environmental resilience, particularly in coastal or industrial zones with high salinity or chemical exposure. The absence of liquid insulation eliminates maintenance-intensive tasks such as oil sampling, breather replacement, and tank sealing checks. Additionally, the compact form factor reduces spatial requirements in switchgear cubicles—critical in urban substations where footprint constraints exist. Electromagnetic performance is enhanced through precise core annealing and winding tension control during manufacturing, yielding ratio errors within ±0.2% for 0.2S accuracy class units under 5–120% of rated primary current (Ipn). The solid insulation also suppresses corona inception voltage (CIV) to above 25 kV peak, well beyond the 28 kV RMS power frequency withstand requirement per IEC 61869-2.
Typical Applications Overview
The UNKNOWN CT is engineered for dual-use applications: revenue metering (accuracy classes 0.2S/0.5S) and protection (5P10/5P20). Its zero-sequence configuration enables sensitive earth-fault detection in unearthed or compensated neutral systems common in 11kV distribution networks across Europe and Asia. Typical deployments include ring main units (RMUs), gas-insulated switchgear (GIS) interfaces, and overhead line reclosers. The transformer’s high short-time thermal withstand capability (e.g., 20 kA for 1 second) ensures survival during downstream fault conditions without saturation-induced measurement distortion.
Technical Specifications
The UNKNOWN 11kV cast-resin current transformer adheres to stringent electrical and mechanical parameters defined by IEC 61869-2 and GB/T 20840.2. Below is a representative specification table for a standard zero-sequence variant:
| Parameter | Value |
|---|---|
| System Voltage (Um) | 12 kV (rated for 11kV IEC / 10kV domestic) |
| Primary Current (Ip) | 50–3000 A (standard); up to 6000 A optional |
| Secondary Current (Is) | 1 A or 5 A |
| Accuracy Class (Metering) | 0.2S, 0.5S per IEC 61869-2 |
| Accuracy Class (Protection) | 5P10, 5P20 |
| Rated Burden | 2.5–30 VA (depending on class) |
| Insulation Level | Power Frequency Withstand: 28 kV RMS / 1 min Lightning Impulse Withstand: 75 kV peak (1.2/50 μs) |
| Short-Time Thermal Current | 20–40 kA for 1 s (proportional to Ip) |
| Dynamic Withstand Current | 50–100 kA peak |
| Ambient Temperature Range | –40°C to +40°C |
| Altitude Limit | ≤1000 m (derating required above) |
Standard Service Conditions
The UNKNOWN CT is rated for normal service conditions per IEC 61869-1: ambient temperature between –40°C and +40°C, daily average not exceeding +35°C; relative humidity up to 100% with condensation; and installation altitude not exceeding 1000 meters above sea level. For altitudes between 1000–2000 m, the power frequency withstand voltage must be reduced by 1% per 100 m increment above 1000 m. In polluted environments (e.g., industrial or coastal areas classified as pollution degree III per IEC 60664), the creepage distance is designed to ≥20 mm/kV (phase-to-ground), typically achieving 240 mm for 12 kV systems. Humidity resistance is validated through 1000-hour damp heat testing (IEC 60068-2-78) with post-test insulation resistance >1000 MΩ at 500 V DC.
Core and Winding Construction
The magnetic circuit utilizes cold-rolled grain-oriented silicon steel (GOES) with a maximum specific loss of 1.0 W/kg at 1.7 T and 50 Hz. Cores are annealed in hydrogen atmosphere to minimize hysteresis losses and residual stress. Secondary windings employ enameled copper wire (Class 180°C insulation) with layer-to-layer and turn-to-turn insulation verified via impulse testing at 2 kV. The VPI process ensures complete resin penetration into inter-turn spaces, eliminating partial discharge sites. Polarity is marked per IEC 61869-2: reducing polarity with “*” symbol on primary and secondary terminals. Terminal blocks are rated for 600 V and accommodate cable lugs up to 185 mm² cross-section.
Typical Applications
The UNKNOWN 11kV cast-resin CT serves critical roles across diverse power infrastructure segments, leveraging its zero-sequence topology for ground-fault sensitivity and its dual-accuracy design for combined metering and protection functions.
Substation Secondary Metering
In 11kV/0.4kV distribution substations, the UNKNOWN CT provides revenue-grade current signals to smart meters and SCADA systems. Configured in 0.2S class with 5 A secondary output and 10 VA burden, it ensures compliance with EN 50470-3 for active energy billing. For example, in a European utility substation feeding a commercial complex, three phase CTs plus one zero-sequence CT monitor load profiles and detect unbalanced currents. The cast-resin housing withstands electromagnetic interference from adjacent switchgear, maintaining ratio error within ±0.15% at 20% Ipn—critical for low-load accuracy in nighttime operation.
Industrial Power Distribution
Heavy industries such as steel mills or data centers deploy the UNKNOWN CT in motor control centers (MCCs) and feeder breakers. Here, 5P20 protection-class units feed inputs to numerical relays (e.g., Siemens 7SJ62) for instantaneous overcurrent and earth-fault tripping. The CT’s high saturation point (≥20× Ipn at 5P20) prevents maloperation during motor inrush currents. In a 10kV Chinese factory, zero-sequence CTs installed on cable trays detect ground faults as low as 0.5 A, enabling selective coordination with upstream devices and minimizing production downtime.
Renewable Energy Integration
Solar farms and wind parks utilize the UNKNOWN CT at the point of common coupling (PCC) for grid compliance monitoring. Per IEEE 1547 and IEC 61727, accurate harmonic current measurement up to the 50th order is required. The low-loss GOES core and tight winding tolerances ensure phase displacement error remains below ±5 minutes at 3rd harmonic content of 15%. In a 20 MW PV plant in Spain, zero-sequence CTs on the 11kV collector feeders enable anti-islanding protection by detecting residual current imbalances during grid disconnection events.
Rural and Suburban Distribution Networks
In rural electrification projects across Southeast Asia and Africa, the UNKNOWN CT’s maintenance-free design is ideal for pole-mounted RMUs. Operating in 10kV unearthed systems, the zero-sequence configuration detects high-impedance faults (e.g., tree contact) with sensitivity down to 1% of phase current. The UV-stabilized resin housing resists degradation under intense solar radiation (tested per IEC 60068-2-5), while IP54-rated terminals prevent dust and water ingress. Field data from Vietnam shows 99.2% reliability over 8 years in monsoon-prone regions.
Compliance with International Standards
The UNKNOWN current transformer is fully certified to IEC 61869-2:2012 (“Instrument transformers – Part 2: Additional requirements for current transformers”) and harmonized with China’s national standard GB/T 20840.2-2014. This dual compliance ensures global interoperability while meeting local regulatory mandates.
IEC 61869-2 Certification Requirements
Per IEC 61869-2, the UNKNOWN CT undergoes type tests including temperature rise (≤60 K for 1.2× Ipn), short-circuit withstand (thermal and dynamic), and accuracy verification across burden ranges. Ratio error and phase displacement are measured using calibrated comparator bridges traceable to national standards (e.g., PTB or NIM). Partial discharge magnitude must remain ≤10 pC at 1.2 × Um/√3 = 8.3 kV. Dielectric tests include 28 kV RMS for 60 seconds (power frequency) and 75 kV lightning impulse (1.2/50 μs waveform). Environmental tests cover thermal cycling (–40°C to +70°C, 10 cycles) and vibration (5–100 Hz, 0.7 g).
Alignment with GB/T 20840.2
GB/T 20840.2 mirrors IEC 61869-2 but includes supplementary clauses for Chinese grid conditions. Key additions include mandatory seismic testing (horizontal acceleration 0.25g per DL/T 593), higher creepage distance requirements for heavy-pollution zones (≥25 mm/kV), and extended thermal endurance at 1.5× Ipn for 2 hours. The UNKNOWN CT exceeds these by incorporating reinforced core clamping and silicone rubber sheds on outdoor models. Accuracy verification under DC offset (up to 80% of AC component) is also required per GB/T, simulating half-cycle saturation during asymmetrical faults—a scenario where the GOES core’s high knee-point voltage (>150 V at 5 A secondary) proves advantageous.
Key Differences Between IEC and Domestic Standards
While IEC 61869-2 permits 1 A or 5 A secondary currents universally, GB/T 20840.2 historically favored 5 A in China, though 1 A adoption is rising for digital substations. Another divergence lies in short-circuit rating: IEC specifies Ith for 1 s, whereas GB/T often requires 3 s ratings for rural networks with slower protection clearing times. The UNKNOWN CT addresses this via scalable thermal mass—core diameter and copper cross-section are adjusted per customer specification. Additionally, GB/T mandates flame retardancy testing per GB/T 5169.16 (equivalent to IEC 60695-11-10), which the cycloaliphatic resin passes with V-0 rating.
On-Site Testing Procedures
Post-installation and periodic field testing ensures the UNKNOWN CT maintains performance integrity throughout its lifecycle. All tests shall follow IEC 61869-2 Annex D and IEEE C57.13.2 guidelines.
Insulation Resistance Test
Using a 2500 V DC megohmmeter, measure insulation resistance between primary winding and ground, and between secondary windings and ground. Acceptance criterion: ≥1000 MΩ at 20°C. Correct for temperature using RT2 = RT1 × 2(T1–T2)/10. Low readings (<100 MΩ) indicate moisture ingress or resin cracking—common after prolonged exposure to thermal cycling. Always discharge windings for 5 minutes post-test to prevent residual charge hazards.
Turns Ratio Test
Apply a low-voltage AC source (50–100 V) to the secondary winding and measure induced primary voltage. Calculate actual ratio as Vs/Vp. Compare against nameplate ratio; tolerance must be within ±0.2% for 0.2S class. Alternatively, use a dedicated CT analyzer (e.g., Omicron CT Analyzer) injecting 1–5 A into primary and measuring secondary current. Deviations >0.5% suggest inter-turn shorts or incorrect tap selection.
Polarity Verification
Connect a 1.5 V DC battery momentarily between primary terminals (P1 to P2). Observe secondary voltage polarity with a center-zero galvanometer connected to S1–S2. A momentary positive deflection confirms reducing polarity. Incorrect polarity causes 180° phase shift, leading to false differential relay tripping. This test is mandatory after any terminal rework or cable replacement.
Power Frequency Withstand Voltage Test
Apply 28 kV RMS at 50 Hz between primary and ground for 60 seconds. Use a calibrated test transformer with overcurrent trip set at 1.5× expected capacitive current (typically 5–10 mA). Failure (flashover or excessive leakage current >10 mA) indicates insulation breakdown. This test is destructive and should only be performed during commissioning or after major repairs—not during routine maintenance.
Excitation (Knee-Point) Characteristic Test
For protection-class CTs, perform excitation test per IEC 60044-1 Clause 8.3. Gradually increase AC voltage on secondary winding while measuring current. Plot Vs vs Is; knee-point voltage (Vk) is where slope decreases by 45°. For 5P20 CTs, Vk must exceed 20 × Is × (Rct + Rb), where Rct is CT secondary resistance and Rb is burden resistance. Low Vk indicates core saturation risk during faults.
Preventive Maintenance Guide
A structured maintenance regimen extends the UNKNOWN CT’s service life to 25–30 years while ensuring operational reliability.
Periodic Inspection Schedule
Conduct visual inspections annually: check for surface cracks, tracking marks, terminal corrosion, or resin discoloration (indicative of UV degradation). Clean housing with mild detergent; avoid solvents that may swell epoxy. Verify torque on terminal bolts (typically 15–20 N·m for M8 studs). Measure contact resistance at terminals using 4-wire Kelvin method; values >1 mΩ warrant cleaning or replacement. In coastal areas, inspect for salt deposits every 6 months.
Maintenance Intervals and Diagnostic Tests
Every 5 years, perform comprehensive diagnostics: insulation resistance, turns ratio, polarity, and excitation curve. Record results in a trend log—sudden changes in Vk or ratio error signal internal degradation. After any system fault exceeding 50% of Ith, conduct immediate post-fault testing. Replace CT if partial discharge exceeds 20 pC during on-site PD mapping (using HFCT sensors). The following table summarizes intervals:
| Maintenance Task | Frequency | Acceptance Criteria |
|---|---|---|
| Visual Inspection | Annually | No cracks, discoloration, or contamination |
| Insulation Resistance | Every 5 years | ≥1000 MΩ at 20°C |
| Turns Ratio & Polarity | Every 5 years or post-fault | Ratio error ≤±0.5%; correct polarity |
| Excitation Curve | Every 10 years | Vk ≥ specified minimum |
Typical Fault Diagnosis
Common failure modes include open-circuited secondary (causing dangerous overvoltage), core saturation due to incorrect burden, and moisture-induced insulation failure. Symptoms: overheating at terminals, abnormal relay operation, or audible humming. If secondary opens during primary current flow, voltages can exceed 5 kV—always short-circuit secondary before disconnecting loads. For saturation issues, verify burden impedance matches CT rating; add burden resistors if necessary.
Conclusion
The UNKNOWN 11kV cast-resin current transformer represents a benchmark in medium-voltage instrumentation, combining the dielectric reliability of VPI epoxy resin with the magnetic precision of GOES cores. Its dual compliance with IEC 61869-2 and GB/T 20840.2 ensures seamless integration into global power systems—from European smart grids to Chinese industrial complexes. Engineered for zero-sequence applications, it delivers exceptional sensitivity for ground-fault detection while maintaining metrological accuracy for revenue metering under varying load conditions. The maintenance-free design, coupled with a 25–30 year service life, significantly reduces total cost of ownership compared to legacy oil-filled alternatives. Rigorous adherence to international test protocols guarantees consistent performance across extreme environmental conditions, making the UNKNOWN CT a dependable choice for modern substation automation, renewable integration, and resilient distribution networks. Its robust construction and precise electromagnetic characteristics uphold the highest standards of safety, accuracy, and longevity demanded by today’s critical power infrastructure.
Q1: Can the UNKNOWN CT operate on a 10kV domestic system?
A1: Yes. While rated for 11kV per IEC standards (Um = 12 kV), it is fully compatible with 10kV Chinese networks, as the insulation level (28 kV withstand) exceeds the 10kV system’s maximum operating voltage.
Q2: What is the minimum detectable ground-fault current?
A2: In zero-sequence configuration with 5P10 class, it can reliably detect residual currents as low as 0.5 A, depending on relay sensitivity and secondary burden.
Q3: Is the resin housing UV-resistant?
A3: Yes. The cycloaliphatic epoxy formulation includes UV stabilizers, validated per IEC 60068-2-5 for 10,000 hours of accelerated weathering.
Q4: Can I use a 1 A secondary with existing 5 A relays?
A4: Only with matching current scaling in the relay settings or external burden adjustment. Never connect mismatched CT secondaries without engineering review.
Q5: What causes ratio error drift over time?
A5: Primary causes include core aging from repeated saturation, moisture ingress degrading insulation, or mechanical stress on windings. Regular excitation testing detects early signs.